Monday, March 24, 2014

REST service in 5 minutes (using Java)

I remember these days when building something similar in Java required much more body movements, and maybe this was the reason to why some start-ups have chosen other weak typing languages with all their fancy Web frameworks for rapid bootstrapping. This isn't the case anymore, see how easy is creating a REST service that supports all CRUD operations in Java:

1. Define your task model:

/**
 * Task model
 */
@Entity
public class Task {
  @Id
  @GeneratedValue(strategy = GenerationType.AUTO)
  private long id;
  private String text;
  private Date created = new Date();
  private Date completed;

  public String getText() {
    return text;
  }

  public void setText(String text) {
    this.text = text;
  }

  public Date getCreated() {
    return created;
  }

  public void setCreated(Date created) {
    this.created = created;
  }

  public Date getCompleted() {
    return completed;
  }

  public void setCompleted(Date completed) {
    this.completed = completed;
  }
}

2. Tell what operations on tasks you're going to support:

/**
 * This class defines DB operations on Task entity
 */
public interface TaskRepository extends PagingAndSortingRepository<Task> {
  // Magic method name automatically generates needed query
  public List<Task> findByCompletedIsNull();
}

3. Configure your application:

/**
 * This class is responsible for:
 *  - Setting up DB connection and ORM
 *  - Initializing REST service for all found entities
 *  - Starting Spring application (main entry point)
 */
@ComponentScan
@Configuration
@EnableAutoConfiguration
@EnableJpaRepositories
@EnableTransactionManagement
public class Application extends RepositoryRestMvcConfiguration {

  @Bean
  public DataSource dataSource() throws PropertyVetoException {
    MySQLDataSource dataSource = new MySQLDataSource();
    dataSource.setDatabaseName("taskdb");
    dataSource.setUserName("user");
    dataSource.setPassword("pass");
    return dataSource;
  }

  @Bean
  public LocalContainerEntityManagerFactoryBean entityManagerFactory(DataSource dataSource) {
    HibernateJpaVendorAdapter jpaVendorAdapter = new HibernateJpaVendorAdapter();
    // Database tables will be created/updated automatically due to this:
    jpaVendorAdapter.setGenerateDdl(true);
    jpaVendorAdapter.setDatabase(Database.MYSQL);

    LocalContainerEntityManagerFactoryBean entityManagerFactoryBean = new LocalContainerEntityManagerFactoryBean();
    entityManagerFactoryBean.setDataSource(dataSource);
    entityManagerFactoryBean.setJpaVendorAdapter(jpaVendorAdapter);
    entityManagerFactoryBean.setPackagesToScan(getClass().getPackage().getName());
    return entityManagerFactoryBean;
  }

  @Bean
  public PlatformTransactionManager transactionManager() {
    return new JpaTransactionManager();
  }

  public static void main(String[] args) {
    SpringApplication.run(Application.class, args);
  }
}

That's all! After invoking this application, you'll get a task complete REST service for free. Let's test it:

Create a new task:

~$ curl -X POST -H "Content-Type: application/json" -d '{"text":"Implement simplest REST Java application"}' http://localhost:8080/tasks

See the task contents:

~$ curl  http://localhost:8080/tasks/1
{
  "text" : "Implement simplest REST Java application",
  "created" : 1395665199000,
  "completed" : null,
  "_links" : {
    "self" : {
      "href" : "http://localhost:8080/tasks/1"
    }
  }
}

Create another task:

~$ curl -X POST -H "Content-Type: application/json" -d '{"text":"Go home"}' http://localhost:8080/tasks

Find all tasks:

~$ curl  http://localhost:8080/tasks
{
  "_links" : {
    "self" : {
      "href" : "http://localhost:8080/tasks{?page,size,sort}",
      "templated" : true
    },
    "search" : {
      "href" : "http://localhost:8080/tasks/search"
    }
  },
  "_embedded" : {
    "tasks" : [ {
      "text" : "Implement simplest REST Java application",
      "created" : 1395665199000,
      "completed" : null,
      "_links" : {
        "self" : {
          "href" : "http://localhost:8080/tasks/1"
        }
      }
    }, {
      "text" : "Go home",
      "created" : 1395665359000,
      "completed" : null,
      "_links" : {
        "self" : {
          "href" : "http://localhost:8080/tasks/2"
        }
      }
    } ]
  },
  "page" : {
    "size" : 20,
    "totalElements" : 2,
    "totalPages" : 1,
    "number" : 0
  }
}
(pay an attention to how easy is it implementing pagination using this REST service!)

Mark the first task as complete:

~$ curl -X PATCH -H "Content-Type: application/json" -d "{\"completed\":$(($(date +%s)*1000))}" http://localhost:8080/tasks/1

Find incomplete tasks:

~$ curl  http://localhost:8080/tasks/search/findByCompletedIsNull
{
  "_embedded" : {
    "tasks" : [ {
      "text" : "Go home",
      "created" : 1395665359000,
      "completed" : null,
      "_links" : {
        "self" : {
          "href" : "http://localhost:8080/tasks/2"
        }
      }
    } ]
  }
}

Pretty easy and yet powerful, huh?

For more information and instructions for how to compile and run this application, see source code on GitHub.

Tuesday, February 04, 2014

Parallelization monster framework for Pentaho Kettle

We always end up with ROFL in our team, when trying to find a name for strange looking ETL processes diagrams. This monster has no name yet:


This is a parallelization framework for Pentaho Kettle 4.x. As you probably know in the upcoming version of Kettle (5.0) there's native ability to launch job entries in parallel, but we haven't got there yet.

In order to run a job in parallel, you have to call this abstract monster job, and provide it with 3 parameters:

  • Path to your job (which is supposed to run in parallel).
  • Number of threads (concurrency level).
  • Optional flag that says whether to wait for completion of all jobs or not.
Regarding the number of threads, as you can see the framework supports up to 8 threads, but it can be easily extended.

How this stuff works. "Thread #N" transformations are executed in parallel on all rows copies. Rows are split then, and filtered in these transformations by the given number of threads, so only a relevant portion of rows is passed to the needed job (Job - Thread #N). For example, if the original row set was:

           ["Apple", "Banana", "Orange", "Lemon", "Cucumber"]

and the concurrency level was 2, then the first job (Job - Thread #1) will get the ["Apple", "Banana", "Orange"] and the second job will get the rest: ["Lemon", "Cucumber"]. All the other jobs will get an empty row set.

Finally, there's a flag which tells whether we should wait until all jobs are completed.

I hope one will find attached transformations useful. And if not, at least help me find a name for the ETL diagram. Fish, maybe? :)

Sunday, January 26, 2014

"Be careful when using or accessing WiFi connection"

Last week my Skype account was hacked during my weekend holidays in Budapest. I don't know how this has happened - I only know that I was logged into Skype from iPhone, and I used a lot of free public WiFi, which are abundant in Budapest. The last day of my journey I tried to call out from Skype, and the call was finished too quickly, which should not have happened, since I remembered there was a ~30 bucks deposit on my account. I checked my account, and I've found a lot of calls to Belarus, which I didn't make of course:


There were more (tens) of entries like this.

The next thing I did was logging out from Skype iPhone app, and changing my password. Then I contacted Skype support, and I've got a Web chat with support engineer. I must say, their support reacted immediately to my request, which looked really professional from their side. I chatted about half an hour from my mobile phone's browser, but finally I've got a refund for all the calls I never did.

The incident is over now (actually, it was over the hour after I realized that my account was hijacked), but it raises the question: "How is that possible that my account was hacked? Is there some insecure part in Skype connection from the iPhone app, like sending credentials over non encrypted channel?". Unfortunately, I've got no answer from the support engineer, except for some funny comments/advises (Postfactum, I've read Skype security evaluation, but I haven't find anything that explains this incident either). Below are selected parts from the chat transcript:

Donald M: Michael, we understand that you would like to have your Skype account secured while using the application. 
Donald M: We’d be more than happy to assist you and provide you the best practice to keep you secured.
Donald M: To help you stay secure, we would like to share with you some useful tips and information about online security:
You: Ok, what can I do to keep the account secure?
Donald M: Please visit this link: http://www.skype.com/en/security/

I've read everything on that page, but I didn't find anything useful except for choosing strong enough password (which was strong enough).

Donald M: We strongly advise that every customer installs sufficient security software, such as an antivirus and a firewall on all their devices that use Skype and to keep them enabled and up to date.
You: Antivirus on iPhone?
Donald M: Skype does its best to keep your communication and personal information secure. 
Donald M: Yes!
Donald M: However, please be aware that Skype users should also take precautions against security threats by not sharing their private data and should install adequate security software on all their devices that use Skype.
You: There's no antivirus software on for iPhone mobile phone

Previously, I explained to the support engineer that I use Skype solely from my mobile phone.

Donald M: Yes and be careful when using or accessing Wifi connection. 

This last sentence simply killed me. What can I do when using public WiFi? Maybe wrap my iPhone into a condom?


Thursday, January 16, 2014

Python code indentation nightmare

After numerous hesitations, overcoming my intuitive distaste of Python as programming language, I finally decided to learn it. This is not just for getting familiar with the core coolness of Python and getting myself into Python mainstream, but more for not finding myself becoming a Java-mastodon (a-la COBOL-mastodon or FORTRAN-mastodon) in the next 10 years. So, I created a little project, and started to push lines of code into it.

My first experience with Python has not changed anything about my bad attitude towards Python syntax:
  • Code structures simply don't look fine without opening and closing curly braces, everything looks like a big unstructured mess.
  • Doc-strings written as a comment in the body(!), where I can write any crap I want simply don't feel like an API documentation to a class/method/function.
  • """, which can be used either as a multi-line comment separator or ... as a multi-line string separator when assigned to a variable. Isn't it weird? One of my university professors used to say: "If you wan't to confuse a man, either call two different things with the same name, or call two equal things with different names", and I totally agree with him.
  • Two forms: "import thing" and "from thing import another_thing". Why do I need both of them? Why can't I just use: "import thing.another_thing" or "import thing [another_thing]" like in Perl?
  • Indentation...

Indentation worth another post. I've spent about an hour trying to understand why Unit test, which I added to a forked project's test suite doesn't run:

class TestSchemes(TestCase):
    ...
    def test_find(self):
        work = Scheme.find('wlan0', 'work')
        assert work.options['wpa-ssid'] == 'workwifi'

 # Added my test:
 def test_mytest(self):
  work = Scheme.find('wlan0', 'work')
  work.delete()
  work = Scheme.find('wlan0', 'work')
  assert work == None

Trying to run - my test doesn't run, and there's no single error. I thought, may be test methods are registered somewhere (unlikely, but who knows..), but this wasn't the case. Maybe test_mytest is some registered name in Python? Tried another method names, but with no luck. Finally, I tried one more thing: copied and pasted one of the existing method's declarations using Vim's 'yy' and 'p' shortcuts, then renamed the pasted method name, and voila! That worked! Hm... What's the difference between:

    def test_mytest(self):
        work = Scheme.find('wlan0', 'work')
        work.delete()
        work = Scheme.find('wlan0', 'work')
        assert work == None

and:

 def test_mytest(self):
  work = Scheme.find('wlan0', 'work')
  work.delete()
  work = Scheme.find('wlan0', 'work')
  assert work == None

Right.. this is white-space against tab. I always indent my code using tabs, so the method I added was also indented using tabs. As it turns out, the original code was indented using spaces, so the new method simply wasn't recognized until I replaced all tabs with spaces. This is really really weird situation, when indentation characters have an effect on execution flow. Don't you agree?

To complete, I'd like to write a couple of warm words about Python. There are plenty of frameworks and libraries written in Python. GitHub is teeming with lots and lots of interesting and fun projects, from which you can learn. If you want to build a fast prototype, it's awesome. Not as awesome as Java + Maven, but still :-) I'm mastodon...

May the source be with you.

Thursday, December 09, 2010

Having fun with NodeJS

This is rather a memo for myself than tutorial of building a simple Web site using server-side JavaScript (read why you may need this).

I have registered a domain name, and purchased a 'Level 1' VPS hosting from HostGator (with pre-installed CentOS 5.5), but you can try this on a virtual machine running on your desktop as well.

1. Let's start from installing node.js:

# Download the source package:
wget http://nodejs.org/dist/node-v0.2.5.tar.gz

# Build & Install:
tar -zxf node-v0.2.5.tar.gz
cd node-v0.2.5
./configure
make
sudo make install

2. Now, we need to install a package manager for node.js:

# It's recommended to run npm from a regular user, so we just make the /usr/local/ directory writable by the group 'wheel', and add the relevant user to this group:

sudo chgrp -R wheel /usr/local/{share/man,bin,lib/node}
sudo usermod -g -G wheel $USER

# Install npm:
curl http://npmjs.org/install.sh | sh

3. As developer of node.js himself states, node.js isn't production ready yet. What he suggests is running node.js behind a reverse proxy, served by nginx, for example.

a) Installing nginx is very easy on CentOS:

# Add EPEL repository:
rpm -i http://download.fedora.redhat.com/pub/epel/5/x86_64/epel-release-5-4.noarch.rpm

# Install 'nginx':
yum install nginx

b) Let's configure nginx proxy:

# First, comment out the server {...} section in /etc/nginx/nginx.conf:

vim /etc/nginx/nginx.conf

# Second, add the proxy configuration to /etc/nginx/conf.d/virtual.conf (we suppose that your node.js application will be running on port 8000):

cat <<EOF >> /etc/nginx/conf.d/virtual.conf
upstream app_cluster_1 {
        server 127.0.0.1:8000;
}

server {
        listen 0.0.0.0:80;
        server_name node.local node;
        access_log /var/log/nginx/node.log;

        location / {
          proxy_set_header X-Real-IP $remote_addr;
          proxy_set_header X-Forwarded-For $proxy_add_x_forwarded_for;
          proxy_set_header Host $http_host;
          proxy_set_header X-NginX-Proxy true;

          proxy_pass http://app_cluster_1/;
          proxy_redirect off;
        }
}
EOF

4. Create your simple Web application:

a) We will use ExpressJS as a Web framework, so we need to install it first:

npm install express

b) Let's install templates engine as well. I've tried to use Haml template engine, but I couldn't make it render pages properly, so I was forced to move to using ejs (and I don't regret that):

npm install ejs

c) Create the application folders:

mkdir /var/www/apps/your_app

# Static content will be placed here:
mkdir /var/www/apps/your_app/static

# Views (templates) folder:
mkdir /var/www/apps/your_app/views

Here are files that we are going to create under these folders:

/var/www/apps/your_app/app.js

var sys = require('sys');
var express = require('express');
var app = express.createServer();

app.configure(function(){
        app.use(express.methodOverride());
        app.use(express.bodyDecoder());
        app.use(app.router);
        app.use(express.staticProvider(__dirname + '/static'));
        app.set('views', __dirname + '/views');
        //app.use(express.errorHandler({ dumpExceptions: true, showStack: true }));
});

var site_locals = {
        copyright: 'Copyright @ Michael Spector 2010',
};

app.get('/', function(req, res){
        res.render('hello.ejs', {
                locals: { site: site_locals },
        });
});

app.listen(8000);

/var/www/apps/your_app/views/layout.ejs

<html>
        <head>
                <title>My App</title>
                <link rel="stylesheet" href="/style.css" />
        </head>
        <body>
              <!-- Pay an attention to this special construct that will be replaced with the actual view contents (hello.ejs in our case): -->
              <%- body %>
              <hr/>
              <%= site.copyright %>
        </body>
</html>

/var/www/apps/your_app/views/hello.ejs

<h1>Hello, World!<h1/>

/var/www/apps/your_app/static/style.css

body {
   text-align: center;
}

5. The last this is making sure that if node.js unexpectedly dies, it will be started again automatically. For this purpose we will install monit:

# Install monit:
yum install monit

# Uncomment "set httpd" entires in the main configuration file:
vim /etc/monit.conf

# Create the configuration file for your application (note that we define NODE_ENV=production variable prior running node.js, which should enable all production features, like caching, etc...):

cat <<EOF > /etc/monit.d/your_app
check host objdump with address 127.0.0.1
    start program = "/bin/sh -c 'NODE_ENV=production /usr/local/bin/node /var/www/apps/your_app/app.js'"
        as uid nobody and gid nobody
    stop program  = "/usr/bin/pkill -f 'node /var/www/apps/your_app/app.js'"
    if failed port 8000 protocol HTTP
        request /
        with timeout 10 seconds
        then restart
EOF

6. Finally, configure all services to start automatically when system boots, and start them:

sudo chkconfig nginx on
sudo chkconfig monit on

/etc/init.d/nginx restart
/etc/init.d/monit restart

monit stop your_app
monit start your_app

If you need to restart your application upon re-deployment, run:

monit restart your_app

Go to http://<your-ip>/, and have fun!

Hope this tutorial helps you.

Thursday, November 25, 2010

Run FindBugs from your Eclipse RCP headless build

Running FindBugs from Eclipse RCP headless build is pretty much simple:

1. Add the following target to your customTargets.xml (replace "com.yourcompany" with your package/plug-in prefix):


2. Create input filter file (findbugs-filter.xml):


3. Invoke "findbugs" target from the "prePackage" target:


4. Make sure environment variable FINDBUGS_HOME points to the installation of FindBugs.

5. (For Hudson users) Install, and configure FindBugs plug-in to get the fancy "bugs" trend graph :-)

Saturday, October 09, 2010

Headless testing of RCP application

A week ago or so I needed to add a Unit Test invocation as part of my Eclipse RCP application headless build. My original PDE build configuration consisted of a single target for .product with "runPackager=true". I was too lazy to create an additional one for the test feature that contains Unit Tests plug-ins (which would cost me in a longer build time, BTW).

So, I decided to include the test feature in a .product, and remove dependency on it after all tests were executed. This simple piece of Ant code does whole the magic:


It needs to be executed twice: once in a prePackage target, and another time in a postBuild target in order to fix the resulted p2 repository as well.

Wednesday, September 22, 2010

GEF: Creating a connection on mouse drag

This tip shows how to implement a connection creation when dragging a mouse from EditPart, thus saving user's time (one click instead of three: activating connection creation tool, clicking on EditPart, restoring selection tool).

What you need is to return a ConnectionDragCreationTool from your EditPart:

public DragTracker getDragTracker(Request request) {
   return new ConnectionDragCreationTool();
}

The problem begins if your EditPart has a Direct Edit policy, Direct Edit commands won't be handled anymore. The following solution supports both: creating a connection on mouse drag and Direct Edit:

Create a proxy that implements DragTracker by delegating to ConnectionDragCreationTool and to SelectEditPartTracker:

public class DragConnectionCreationProxy implements DragTracker {

  private ConnectionDragCreationTool connectionTool;
  private SelectEditPartTracker editPartTracker;

  public DragConnectionCreation(EditPart editPart) {
    this.connectionTool = new ConnectionDragCreationTool();
    this.editPartTracker = new SelectEditPartTracker(editPart);
  }

  public void commitDrag() {
    connectionTool.commitDrag();
    editPartTracker.commitDrag();
  }

  // Implement all other methods ...
}

Then return this class instance from your EditPart:

public DragTracker getDragTracker(Request request) {
  return new DragConnectionCreationProxy(this);
}

Monday, May 10, 2010

Fixing Mvix Ultio firmware

I always dreamed of a small NAS with BitTorrent capabilities to replace my noisy and always hot AMD-based HTPC computer. Last week I've received Mvix Ultio (MX-800HD), which I bought on eBay. This box connected to your LAN via either a cable or wireless from one side, and to your TV panel (via HDMI video and optical audio) from the other side, while having a 3.5 SATA disk bundled inside can be turned into a powerful entertainment device (with minimal power consumption).

The first thing I did when I connected this device, is flashing a new firmware v3.0 from Mvix Ultio support site. I enabled BitTorrent client and Samba plug-ins, as was described in manual. At that time I didn't expect any disappointment, but it came soon when I left it on overnight: the device hanged every couple of hours with no possibility to reboot it using remote control or panel buttons. I've read in one forum that unlimited number of peers in a bundled BitTorrent client (btpd) can kill this device easily. I tried to change settings of btpd startup script via telnet, but with no success as /etc is actually mapped to memory, and is not changeable.

Below comes a remedy process based on fixing an existing firmware, and preparing it for further hacking :)

DISCLAIMER: I take no responsibility for any damage you might cause to your device by following this guide.

1. You must have some Linux machine for that (choose yourself, what's easier: installing Ubuntu on VirtualBox or installing Cygwin on Windows? :-])

2. Download, compile and put mkyaffs2image and unyaffs utilities under your $PATH.

3. Extract existing firmware image:

mkdir install
cd install
tar xvf ../intsall.img

4. Extract contents of yaffs2_1.img:

cd package2
mkdir yaffs2_1
cd yaffs2_1
unyaffs ../yaffs2_1.img
cd ../

5. Extract contents of usr.local.etc.tar.bz2 (this archive will be extracted into a writable partition on a device, partition size is controlled by <sizeBytesMin> entry in configuration.xml):

mkdir usr_local_etc
cd usr_local_etc
tar jxvf ../usr.local.etc.tar.bz2
cd ../

The whole idea is to place things that we might need to configure later on a running device into this archive. So I've just merged contents of package2/yaffs2_1/etc/ into this archive (please do it carefully as there are plenty of symlinks pointing to the same place: /usr/local/etc). Then, I removed whole directory package2/yaffs2_1/etc/, and created a symlink instead:

rm -rf yaffs2/etc
ln -s /usr/local/etc yaffs2/etc

6. Now, lets fix the BitTorrent client settings:

vi yaffs2_1/usr/local/bin/package/script/bt.script
# find "start running btpd", and add needed settings after the $btpdbin
# (I've just limited a number of peers by adding: --max-peers 48)

BTW, you can move this script into /usr/local/etc archive too, and create a symbolic link to it, if you wish to modify it later on a running device.

7. Compress usr.local.etc.tar.bz2 back:

cd .usr_local_etc/

# Restore original files ownership (I don't know whether this is crucial):
chown -R 500:500 .

tar jcvf ../usr.local.etc.tar.bz2 *
cd ..
rm -rf usr_local_etc

7.1 (maybe optional) I don't know what's the point in duplicate /usr/local/etc/ folder contents under package2/yaffs2_1/usr/local/etc/, so I just did the following:

cd yaffs2_1/usr/local/etc/
rm -rf *
tar jxvf ../../../../usr.local.etc.tar.bz2
cd ../../../../

8. Compress yaffs2_1.img back:

# Restore original files ownership
chown -R 500:500 yaffs2_1/

mkyaffs2image yaffs2_1 yaffs2_1.img
chmod 644 yaffs2_1.img
rm -rf yaffs2_1

9. Compress the firmware image back:

# Restore original files ownership again :)
chown -R 500:500 .

tar cvf ../install.img *
cd ../
rm -rf install/

That's all. Now you're ready to go, and flash your box with the updated firmware.

PS: I'm too lazy to write how to setup "ipkg" package manager on Mvix Ultio, which allows installing additional software on this device, may be later...

HTML5 Geolocation API is scaring me

What happens if you try to open the following HTML code in your Firefox (or any other browser that supports Geolocation API)?

<html>
<head>
  <script type="text/javascript">
    if (navigator.geolocation) {
      navigator.geolocation.getCurrentPosition(function(position) {  
        document.location.href =
          "http://maps.google.com/maps?q=" 
          + position.coords.latitude + ",+" 
          + position.coords.longitude
          + "+(I'm%20here!)&iwloc=A&hl=en";
      });
    }
  </script>
</head>
<body>
</body>
</html>

I was pretty scared when I've seen my own house. Actually, I was informed about the fact that the site "wants to know my location", but isn't it just as a matter of courtesy by Firefox!? May be I'm just wrongfully paranoid :-/

Tuesday, January 19, 2010

Using animated GIF in CLabel

Have you ever tried to use animated GIF in Eclipse RCP? Unlike using regular image you have to provide your own mechanism that switches between image frames when using animated GIF (more about this is here). Fortunately, you can save in implementing your own thread by using org.eclipse.ui.internal.ImageCycleFeedbackBase and org.eclipse.ui.internal.AnimationEngine (though these classes are still in internal package). Let's say we need to add an animated image to a CLabel. First of all, we extend ImageCycleFeedbackBase:

public class AnimatedLabelFeedback extends ImageCycleFeedbackBase {
 private CLabel label;

 public AnimatedLabelFeedback(Shell parentShell, CLabel item, Image[] images) {
  super(parentShell, images);
  label = item;
 }

 public void initialize(AnimationEngine engine) {
  background = label.getParent().getBackground();
  display = label.getParent().getDisplay();
 }

 public void saveStoppedImage() {
  stoppedImage = label.getImage();
 }

 public void setStoppedImage(Image image) {
  label.setImage(image);
 }

 public void showImage(Image image) {
  if (!label.isDisposed()) {
   label.setImage(image);
  }
 }
}

This is how we attach animated GIF to the newly created CLabel:
label = new CLabel(parent, SWT.SHADOW_NONE);
Image[] images = loadAnimatedGIF(parent.getDisplay(), "icons/obj16/animated.gif");
AnimatedLabelFeedback feedback = new AnimatedLabelFeedback(parent.getShell(), label, images));
animation = new AnimationEngine(feedback,
  -1, // endless
  100 // delay between frames in milliseconds);
animation.schedule();

loadAnimatedGIF() is implemented as follows:
private void loadAnimatedGIF(Display display, String imagePath) {
  URL url = FileLocator.find(Activator.getDefault().getBundle(),
    new Path(imagePath), null);
  ImageLoader imageLoader = new ImageLoader();
  imageLoader.load(url.openStream());
  images = new Image[imageLoader.data.length];
  for (int i = 0; i < imageLoader.data.length; ++i) {
    ImageData nextFrameData = imageLoader.data[i];
    images[i] = new Image(display, nextFrameData);
  }
}
Dispose animation engine when it's not needed anymore (usually in dispose() method):
animation.cancelAnimation();

PS: @since 3.3

Monday, October 26, 2009

Optimize fetching of sources from Eclipse.org

Did you ever try to build something from sources placed in Eclipse.org? If your .map file contains just a couple of entries - you're OK, but if there are tens of plug-ins to fetch - the mission becomes really impossible, especially during Eclipse.org server maintenance times. I've wrote a simple Ant task, which shortens the build time twice (at least our Hudson shows so). The Ant task is invoked right after the "getMapFiles" PDE builder task, and does very simple steps:

1. Runs "rsync -az" to synchronize local CVS repository with the remote one.
2. Updates .map file to direct fetch process to the local repository.

What you need:

1. Local CVS repository (I used these steps to setup one).
2. Set-up SSH private/public keys to the Eclipse.org, so "rsync" will work seamlessly.

May be this trick is one of CVS advantages over SVN :)

Thursday, October 08, 2009

PDT 2.2.0 early access

Recently, I've posted these instructions for installing PDT 2.2.0 from the update site. The new version of PDT contains numerous performance improvements due to the new indexer. As always, please report bugs if you encounter any.

BTW, big thanks to Jacek Pospychala (and Nickb's support, of course :-]) PDT has moved to using Athena as a builder. Watch live PDT builds if you have permissions, of course :)

Sunday, July 19, 2009

New DLTK indexing is promising

The last couple of weeks I've been working on improving DLTK indexer, which was derived from JDT as is. The original bug report sounds like: "Indexing must be adapted for dynamic languages". I have to explain this point a little bit. In Java, every element reference is strongly bound to the original declaration. This is why one can calculate this binding during source code parsing and hold it in a memory (probably update it when referenced/referencing elements are changed). This is not the case for dynamic languages, consider this example (PHP):

<?php

function __autoload($class_name) {

    require_once $class_name . '.php';

}

$obj  = new MyClass();

?>

In this example PHP file is included before the class is loaded, and there's no way for IDE to determine which one. In order to have all JDT-like features in DLTK-based IDE resolution of elements binding is done each time from scratch. This ends up with a lot of queries and updates to index file, which are very I/O intensive operations.

We've tried to implement indexing using H2 database, and the results are really amazing! Here's a screen-cast showing how fast building of full hierarchy for 'Exception' class is using H2 database based index. Comparing to an older implementation I must admit that it's 10 times faster. Due to the fast access to the model most of other features will have great performance as well: Code Assist, Source Navigation, Source Editing, Mark Occurrences, etc...

I hope this will be included into DLTK 2.0.0 and PDT 2.2.0.

Tuesday, May 19, 2009

@var magic comment

This is a good example how people get used to a bad habits. @var magic comment has appeared first in early Zend Studio, and this is how it was used:


As you can see this magic comment makes content assist know what is the type of $test variable. With PDT 2.0 we have canceled this behaviour due to promising type inference engine, that can resolve variable back to the place where it was declared. For example:


As it turned out later this is not enough for most PHP developers as there are many cases where there's no reference from variable usage to its declaration (if declaration exists at all). One example has changed our mind, and we've decided to fix 260805, 249705 and 257481 ASAP.
One famous MVC framework magically allows to refer to View members from within .phtml script using $this variable. To support this you definitely need something to tell content assist that $this variable is actually an instance of some class even though it appears in a global scope...
Ouch... PHP is full of magic :)

PS: @var comment fixes are available in 2.1.0M7, but I suggest using latest integration build.

Continuous Integration for Eclipse-based product: thoughts

I've been thinking what is the best way to create a fully bottom-up build infrastructure for Eclipse-based product. What I mean by "fully" is:
  1. Developer commits code.
  2. A new build starts automatically.
  3. If the build succeeds - run tests.
  4. If tests are successful - tag the code.
Advantages of this scheme are the following:
  1. I'll always know what's the status of the product in CVS.
  2. I can choose the "best" package and promote it without invoking any builds.
Looks simple, isn't it? Now, how would I achieve this with what I have in my hands... In my hands I have:
  • CVS repository
  • Hudson
  • Eclipse
Unfortunately, Hudson can't be used for 100% when building Eclipse plug-ins, since it's rather used as a wrapper to the Eclipse PDE builder. Here, I don't use the ability of Hudson to poll SCM, checkout & tag, present history, etc... OK, I can setup some CVS handler that invokes build in Hudson by accessing URL. So, the first two problems are solved. Hudson executes build script that uses PDE headless builder to build & test my plug-ins. If the build & test where unsuccessful, then I'll see very sad Mr. Hudson and everything is good so far.  But if the build was OK, and number of failed tests is less or equal than in the previous build - then I have to tag the sources. And here I miss the "Team -> Release" action in Ant :-) Even if there was such an action the problem still remains, since plug-ins are versioned with 'HEAD' (and I don't want to use common timestamp version for all plug-ins, but rather for those that have changed from the last tag). 

As a conclusion: I see a lot of black magic work and hacks to get this done. Or... am I missing some pretty solution here? 


Friday, April 10, 2009

"Writing Eclipse plug-ins in PHP"

The GSoC proposal starts gathering scores. Why this idea is so important? PHP developers have a lot of requests for improving the IDE. Why wait for mercy of project committers? Imagine that you can easily use the language (that you're not afraid of) for adding some new functionality to your lovely IDE. Isn't it great? William Candillon, the student that has proposed this project participated already in GSoC in 2006, 2007 and 2008. I'm quite confident that his participation this year will be felicitous for him and for the community too :)

Thursday, March 26, 2009

Good bye, EclipseCon '09!

One more EclipseCon is over. A lot of new thoughts I'm taking away with me. Having a lot of "fun" with PDE builder in the past I was inspired by having a chance to learn about PDE builder wrappers: Dash Athena and Buckminster. Both projects look very interesting, though I haven't tested them yet (Buckminster should be the first one to start with due to .product file support).
I'm still under the impression of Single sourcing RCP and RAP and Runtime Riena and SOA. These give you to understand that Eclipse can be used as a platform for creating simple (or even complex) information systems very quickly. Trying both technologies is "a must", and I gonna do that in a near feature.

There where things that I'm not convinced still in their necessity. For example, who will need a Real Time Shared Editing? Don't tell me about pair programming. I'm in doubt that simultaneous typing can have some benefits. Usually, it's one who's typing and another who's staring at the code behind the shoulder. Another example - Cloud IDE Principle. It would be nice to have something like that (and the reason is NOT, since we don't want to bring source code to the local machine, and then deploy it back), but wait, is Web technology strong enough for that? People are used to rely too much on a single XMLHttpRequest... 

Anyway, it's good that world global crisis does not apply on a public interest in Eclipse. It applies on a number of free T-shirts and bags though - I'm coming back without presents...

Sunday, March 08, 2009

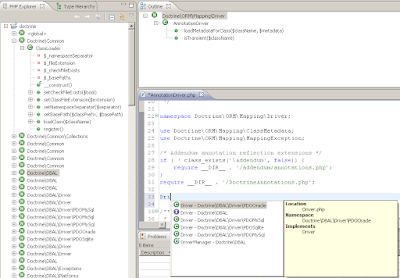
PHP 5.3 support in PDT - 2nd stage is over

I think picture is worth a thouthand of words (if this ain't photoshop, of course)


Just a few words more, the following bugs where fixed recently:

261816 - Add namespaces presentation into PHP Explorer.
261817 - Provide Code Assist for PHP 5.3 elements.
261818 - Provide namespace information in the Outline & PHP Explorer views.
264952 - Add USE statement automatically after inserting Code Assist proposal.

Special thanks to the Doctrine Project that provided as with a great PHP application written for PHP 5.3, which we use for testing purposes.